
AI Character Sheet Generator: From Reference to Video
Create a character you can recognize from another angle, save the identity, then use the right reference for your next image or video.


Choose the reference your next shot needs
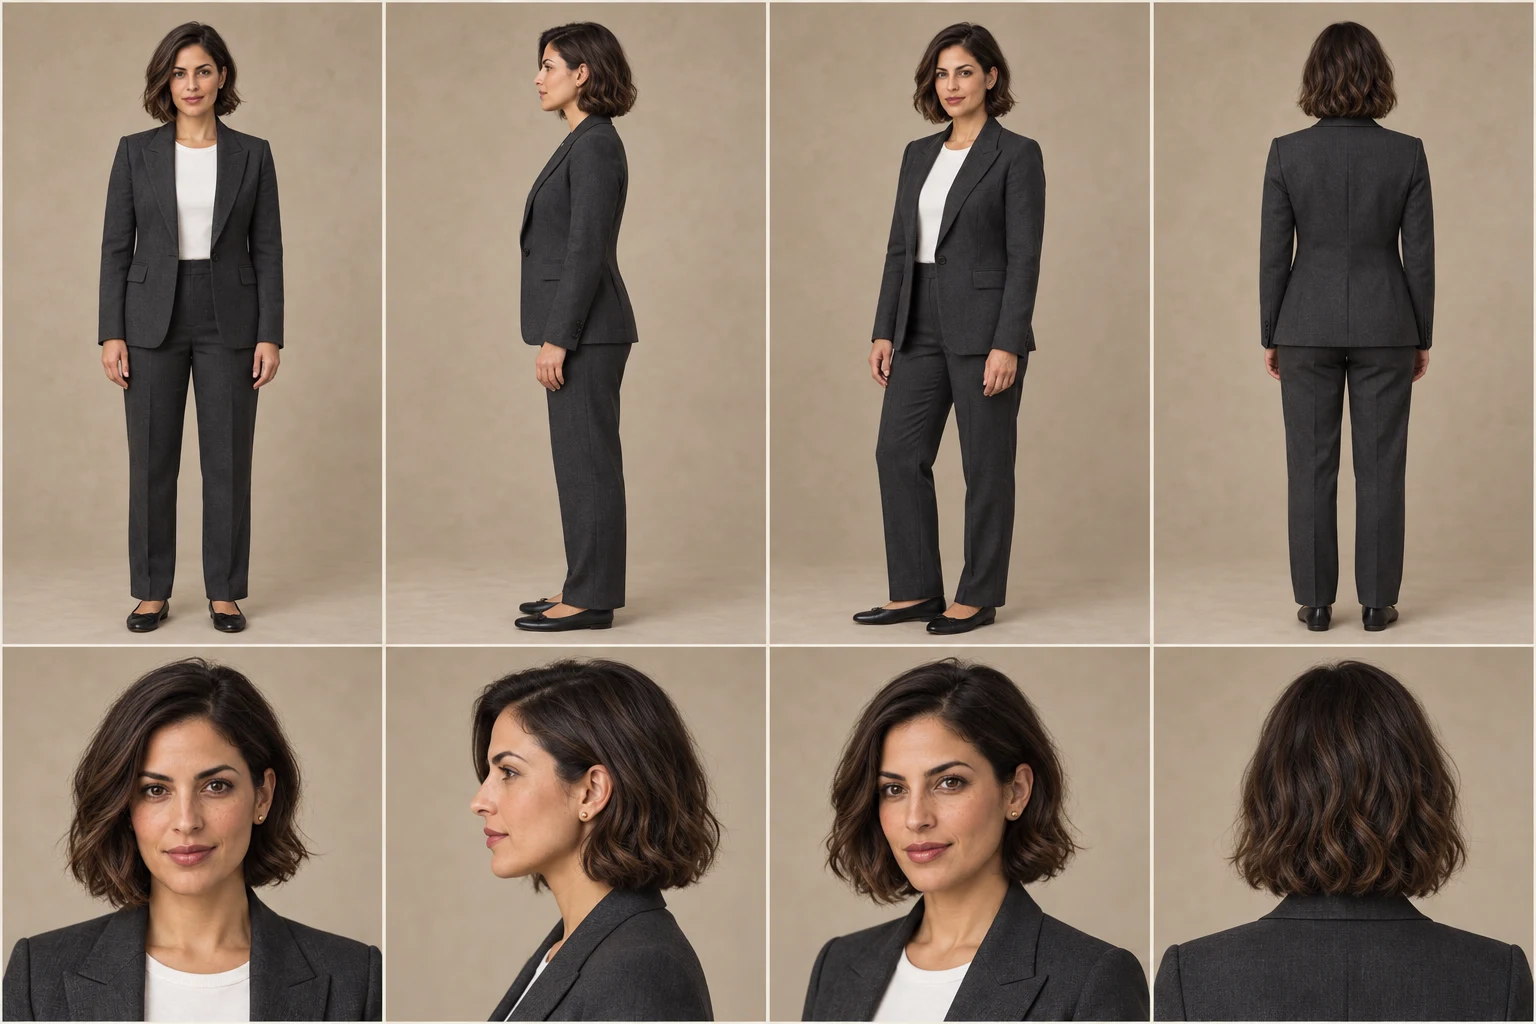
These existing Character Studio references show two useful formats: a character sheet for checking the design and a single portrait for putting that character to work.

The complete reference
This published eight-panel example combines four body views with four close-ups. Compare the suit, hair and proportions across the sheet.

A recognizable character
Dixie’s portrait makes her face, blonde updo and satin sports vest easy to inspect before asking for a new look.
A new look
The existing Dixie variation changes the wardrobe to a pink top, white skirt and boots. Check what stays recognizable when the styling changes.


The sheet and Dixie are separate character examples. These are existing generated results, not a promise that every generation will preserve every detail.
Character Studio / Recast
Characters in motion.
Meet Dixie and Vesper in two videos generated with Recast.
 Still from the generated video
Dixie · dance
A pink-and-white look, carried into a dance sequence.
 Still from the generated video
Vesper · character comedy
An insect fashion designer in a sports-car scene.
Start with your own character and motion reference. Each generation creates a new result.
Open RecastA good AI character sheet generator gives you a reference you can use after the first image: the same face, a readable outfit and a character you can recognize from another angle.
In Character Studio, you can build that identity with Nano Banana 2.1, save the character, create new looks and prepare a Recast video from the look you choose. Start with a portrait when the face matters most. Create a sheet when you need to inspect the whole design.
Create your character in Character Studio →
What is an AI character sheet?
A character sheet brings several views of one design into a single image. For a human character, you are checking the face, hairstyle, clothes, proportions and accessories. For a creature or mascot, the silhouette, limb count and distinctive features matter just as much.
Character Studio’s sheet workflow requests four full-body angles: front, three-quarter, side and back. The close-up option adds four matching head-and-shoulder views for an 8-panel character sheet. The example above shows that eight-panel format; the layout you request and the image you receive still need to be checked.
The goal is controlled coverage. A convincing front view is less useful if the jacket, body shape or hairstyle changes on the back view.
Portrait or full character sheet: which should you make first?
| What you want to create | Start with | What to inspect |
|---|---|---|
| A recurring presenter or close-up | Portrait reference | Face shape, eyes, hair and signature details |
| A full-body scene or a costume-led character | Character sheet | Outfit, silhouette, proportions and footwear |
| Several angles for a storyboard | Sheet, then the relevant single view | Whether the same design survives each angle |
| A new outfit for a saved character | New Look | Identity stays recognizable while the requested styling changes |
| A Recast clip | The selected portrait or look | Face, wardrobe and framing fit the intended action |
A sheet is a design reference, not automatically the best input for every generation. A model can reproduce its grid or mix details between panels. For a single scene or Recast, choose a suitable character image rather than assuming the whole board will be interpreted correctly.
Build a reusable character in Character Studio
1. Give the character a clear identity
Start from a description, a reference image you can use, or a previous render you trust. Describe the details that make the character recognizable: face shape, hairstyle, silhouette and one or two distinctive features. Include the clothing when it needs to stay consistent.
Keep the brief specific enough to judge. “Stylish woman” leaves many choices open; “short brown bob, dark tailored suit, white crew-neck top and black shoes” gives you visible details to compare.
2. Generate a portrait, then save the version you want to keep
Review the first result before building a series around it. Check the eyes, hairline, hands and any unusual anatomy. Save the character when the identity works. Your saved character becomes the starting point for subsequent looks instead of another description you have to reconstruct.
Character Studio uses Nano Banana 2.1 for these character images. Choose the format and quality in the app, then review the current quote before generating.
3. Create the sheet from the character you chose
Use the character-sheet action when you need the broader reference. Keep the background and pose simple so the views are easy to compare. Add close-ups when facial details need their own space.
Example brief to adapt, not the recorded prompt of the published sheet:
Use the selected character as the identity and outfit reference. Show front, three-quarter, side and back views of the same person. Preserve the short brown bob, dark tailored suit, white top, black shoes and body proportions. Neutral pose, even studio light, plain background. Keep the complete figure visible in every body view.
The app’s sheet settings determine the requested layout. Use the brief to clarify what must stay the same, not to ask for four different outfits in a turnaround.
4. Check the sheet before reusing it
Inspect the views together, then zoom into the details:
- Face: do the jaw, nose, eyes and hairstyle belong to the same person?
- Outfit: do closures, sleeves, shoes and accessories agree between views?
- Body: do height and proportions remain plausible as the character turns?
- Distinctive anatomy: are a creature’s limbs, antennae or other features consistent?
- Framing: is the complete figure visible where you requested a full-body view?
A profile can naturally hide the far arm or leg. Compare the underlying design rather than expecting every feature to be visible from every angle. If a view changes the identity, correct it before using it as your reference.
Change the look without starting the character again
Once the identity works, New Look lets you change the styling of a saved character. The Dixie examples above show the useful comparison: a sports portrait and a later pink-and-white outfit. They give you something concrete to inspect instead of a claim of “perfect consistency.”
Name the change you want: wardrobe, hairstyle, accessories, setting or light. Keep the identity reference and review the result before saving the new look. This is useful for a recurring social presenter, a campaign character or a fictional cast that needs more than one costume.
For a deeper scene-by-scene method, read how to create consistent AI characters across images and video.
Bring the selected look into Recast
The next useful asset may be a clip. Recast takes a character image and a scene direction. You can select a passage from a source video to guide motion and staging, add a separate product reference, write dialogue, or supply an audio passage as a reference for timing and delivery.
Choose the source passage deliberately. A clear performer and readable action make the result easier to evaluate than a clip full of cuts or occlusion. A source video guides the generation; it is not a promise of an exact frame-for-frame replacement. Reference audio guides delivery and does not establish an exact soundtrack copy.
Recast offers 480p, 720p and 1080p. Source passages can be up to 15 seconds; output duration is 2–30 seconds, with source plus output limited to 30 seconds when a source video is used. The app shows the available duration and current quote for your selection before confirmation.
See the existing Dixie and Vesper Recast examples, then open Character Studio to choose your own character and scene. For products, compare the generated object with its reference as carefully as the face.
Common character-sheet questions
Can I create a character sheet without a photo?
Yes. Start from a fictional character description. Once you have a design you like, save it and use that identity for the next look or sheet. Check the first image before treating it as the reference.
Do I need eight panels every time?
No. Four body views may be enough for a turnaround. Add the matching close-ups when face details matter. For one close-up or a talking character, a clear portrait may be the more useful starting point.
Why does the outfit change between views?
Check whether the reference actually shows the outfit clearly. Simplify the pose and background, specify the visible details that must remain, then inspect the new result. More descriptive text cannot compensate for an unclear reference in every case.
Will a sheet guarantee the same character in every video?
No. A sheet helps define the design; the selected image, video mode, motion and framing affect the result. Review the start, middle and end of a clip before using it in a finished sequence.
Make a character you can return to
Build the portrait, save the identity, check the sheet and create the next look. When the image is ready, carry that selected look into Recast. Start in Character Studio and make the reference your next scene actually needs.